
Helo guys! This is my 1st blog post. I have decided to give a basic understanding of how to think and code different assignments and projects. In this post I will share a very basic MATLAB example related to image processing. I will definitely go to advanced level with passage of time. I am excited to hear from you about suggestions and ideas. I ll try to code your ideas and post them on my blog as earliest possible. I ll keep posting a new example each week.
Today, I am going to give a brief overview about a very simple topic in image processing that is Pixel Connectivity. We, together, not only cover the basics but also implement the object labeling algorithm using 8 connectivity in MATLAB. Cool !
Pixel Connectivity
Pixel Connectivity is the way how pixels in an image are related to their neighboring pixels. Neighbors of pixel are the pixels that are adjacent to the identified pixel. Lets look at the picture given below.
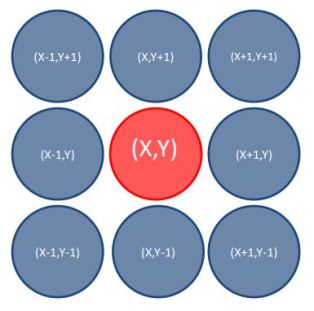
Here, if we talk about a single pixel in red, then all the other pixels are its neighboring pixels. Simple!
Now, when we say the pixels are connected to each other? We say that two pixels are connected to each other if:
- One pixel is in the neighbor of other pixel
- Their gray levels (Colors) satisfy a specified criterion of similarity. (Now, Its up to you according to your application. Maybe you want a single color, lets say pixel are said to be connected if they are all white and are in the neighbors.
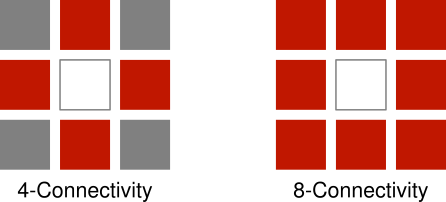
There are two basic types of pixel connectivity named as 8 connectivity and 4 connectivity. In 8 connectivity you are seeing the all 8 neighboring pixels while in 4 connectivity you look at only 4 pixels excluding the diagonal pixels. Lets see the examples of each in figures you will be more clear. Here the white box is the current pixel and red boxes are its connected pixels.
8-Connectivity Labeling
8-connectivity can be used to label different connected objects in a grey scale image. I will show you a basic algorithm to label objects using 8 connectivity and also help you to implement the algorithm in MATLAB.
2 Pass Algorithm
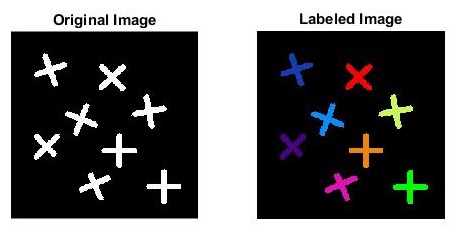
One of the algorithm for 8 connectivity labeling is 2 Pass Algorithm. Firstly, we will assign a unique label to every connected object then each object will be shown in a unique color.
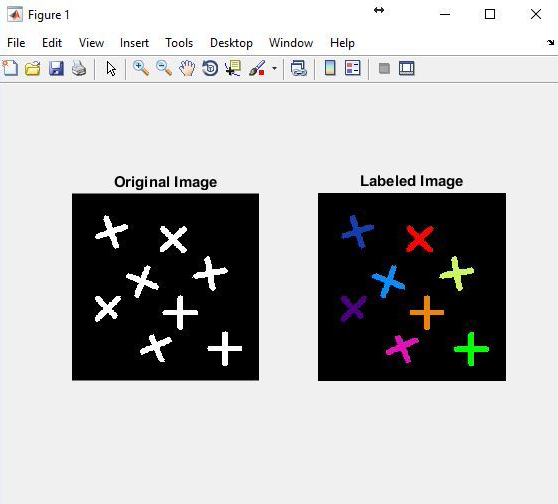
Here is the given picture and what we want to achieve:
MATLAB Example:
OK guys. Now open up your computers and try to write this code with me. Please don’t copy and paste the code. You will not going to learn programming unless you get your hands dirty with it. Don’t afraid of errors. With each error and your effort in trying to remove the error you will always learn a new thing.
I will try to explain each and every thing but still if you have any query or confusion do comment. I will try to get back to you as soon as possible.
Lets start:
I have an image named “image.bmp” which is the same as the left one in the above figure. First of all, I want to read that image in MATLAB and store it in a variable so I can proceed forward.
clc
clear all
close all

File_Name = 'image.bmp';    %Image file name
Input_Image = imread(File_Name);     %Reading input image
Now I have stored the image in the variable “Input_Image”. The variable contains 1’s and 0’s as the image is binary. It means 0 for black and 1 for white color. What I want is to label the object which is white (1).
Now I am going to find out the size (dimension) of image which I will use in future. At the same time I want to define image background as 0.
[rows cols] = size(Input_Image);    %Dimensions of input image.
Bkgrd = 0;
Now I want some initializations for further use. What I want is a matrix of the same size as image for labels. Because I have to tell for every pixel what its label is.
I will start from the label zero. And keep updating it and will store what labels are equivalent. To store equivalent labels I prefer a cell array. If you are not getting my point go to the link provided for 2 Pass Algorithm and see how it works.
Label_Matrix = zeros(rows,cols);    %Separate Matrix for labels.
Current_Label=0;
Equiv_Table= {};    %Cell array
PASS 1:
I will start from the very 1st pixel at the top left. Iterate through each pixel. For that what I will need is two for loops. 1 will change the rows and other will change the columns. Got it? Lets look at the code.
Then, I will check whether it is a foreground (1) or background (0). For that I just need an if statement. That’s it.
If the current pixel is foreground, I will check its neighbors if they are labelled or not. there can be two scenarios:
- No Neighboring pixel is labeled.
- Any of the neighboring pixel is labeled.
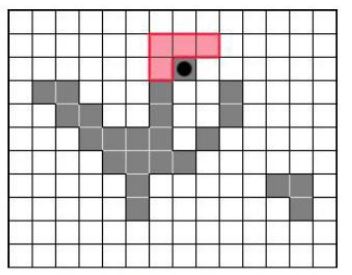
For that I have to check only 4 pixels (3 top and 1 left) because we are going from left to right pixel by pixel, there is no need to check other 4 pixels(1 right and 3 bottom).
If none of the neighboring pixel is labeled then I will update the current label assign the new label to current pixel. Record the new label in the Equivalence table with same index as label value.
If any of the neighboring pixel is labeled then I have to know what all the neighboring pixels are because they are equivalent to each other. So I will collect all the neighboring labels into one array (Not for background pixel remember). Then I will pick the smallest value of label among these pixels and assign it to current label. And the most importantly I will put all the neighboring labels to the equivalence table.
Now lets look at the code.
%% (Pass 1)
for i=1:rows %Outer loop. Changing rows.
             % ** Scan through each pixel
    for j=1:cols %Inner loop. Changing column.

        % If Current Pixel is not Background.
        if(img(i,j)~=bkgrd)

            % Checking Neigbours.
            % If no neighbour is labelled.
            if(lblMat(i-1,j-1)==0 && lblMat(i-1,j)==0 && ...
            lblMat(i-1,j+1)==0 && lblMat(i,j-1)==0)
                CurrLbl = CurrLbl + 1 ; %Go to new label.
                %Assign new label to current pixel.
                lblMat(i,j) = CurrLbl;
                %Store new label in same index as label value.
                eqTable{CurrLbl} = CurrLbl;
            % If Any neigbour is labelled.
            else

                %Get neigbouring labels and put them in a vector.
                %(For 1 Left and 3 top pixels.)
                Neighbor_Labels = ...
[lblMat(i-1,j-1) lblMat(i-1,j) lblMat(i-1,j+1) lblMat(i,j-1)];
                Neighbor_Labels = ...
                %Neighbouring labels other than background.
                Neighbor_Labels(find(Neighbor_Labels~=bkgrd));
                %Pick the smallest label from neighbours.
                Minimum_label = min(Neighbor_Labels);
                %Assign minimum label from pixel to current pixel.
                lblMat(i,j) = Minimum_label;
                %Put neighboring pixels to equivalence table.
                eqTable{Minimum_label} = ...
union(eqTable{Minimum_label},Neighbor_Labels);

            end

        end

    end

end
Now I have to deal with equivalence table. I will gather all the equivalence labels into their respective cells e.g. for cell array 1 I have to put all equivalence labels of 1 into cell 1. All I want to do is gather labels according to cell index.
For that I will access each array of cell. For all the elements in a cell I will gather their equivalence labels into their respective indexes.
%% Gathering all equivalence values in each of respective index.
[m n] = size(eqTable);
for k = n:-1:1 %Accessing each array withing the cell
    for l = eqTable{k} %Acessing each elecment within the array.
        eqTable{l} = union(eqTable{k},eqTable{l});
    end
end

for k = 1:n
    for l = eqTable{k}
        eqTable{l} = union(eqTable{k},eqTable{l});
    end
end
Pass 2
Equivalence table is all set. Now I will assign each label to its lowest equivalence value. At the end of this step we should have same unique labels as the number of objects.
This is too easy. I will loop through each value of label matrix. And if I will find any label, it will be replaced by the smallest equivalent label.
%% Re labeling (Pass 2)
for i=1:rows %Outer loop. Changing rows.
    % ** Scan through each pixel
    for j=1:cols %Inner loop. Changing coloumn.
if(lblMat(i,j) ~= 0) %If any label is found.
            %Relabel the pixel with the lowest equivalent label.
            lblMat(i,j) = min(eqTable{lblMat(i,j)});
        end
    end
end
Now here comes the fun part. Now I will assign a color for each of the label. For that I need to create a 3 channel image. Remember I was using a binary image. But dont worry its simple. All I am going to do is to generate random colors by using randi command which will generate 3 random numbers for each of the color.
%% Colouring

%Initializing Matrix with three chanels.
RGB_Image = uint8(zeros(rows,cols,3));
Unique_Labels = unique(Label_Matrix);
%Unique Labels (Exclude 0).
Unique_Labels = Unique_Labels(find(Unique_Labels~=0));
%Generating Random Colour for each unique label. 1 row = 1 color.
RGB_Colours = randi(255,[length(Unique_Labels),3]);

for i=1:rows %Outer loop. Changing rows.
    % ** Scan through each pixel
    for j=1:cols %Inner loop. Changing coloumn.

        if(Label_Matrix(i,j) ~= 0) %If any label is found.
            %Making RGB Image. 1st color assigned to 1st label.
            RGB_Image(i,j,:) = RGB_Colours(find(Unique_Labels==Label_Matrix(i,j)),:);
        end
    end
end
Thats it. Now I will just show the original Image and Labeled Image by using “imshow” command.
%% Ploting
%Labeled and Original Image
figure;
subplot(1,2,1);
imshow(Input_Image);
title('\bf \color{blue} Original Image ','linewidth',2)

subplot(1,2,2);
imshow(RGB_Image);
title('\bf \color{blue} Labeled Objects ','linewidth',2)
Finally 🙂
Code file and image can be downloaded from here.
